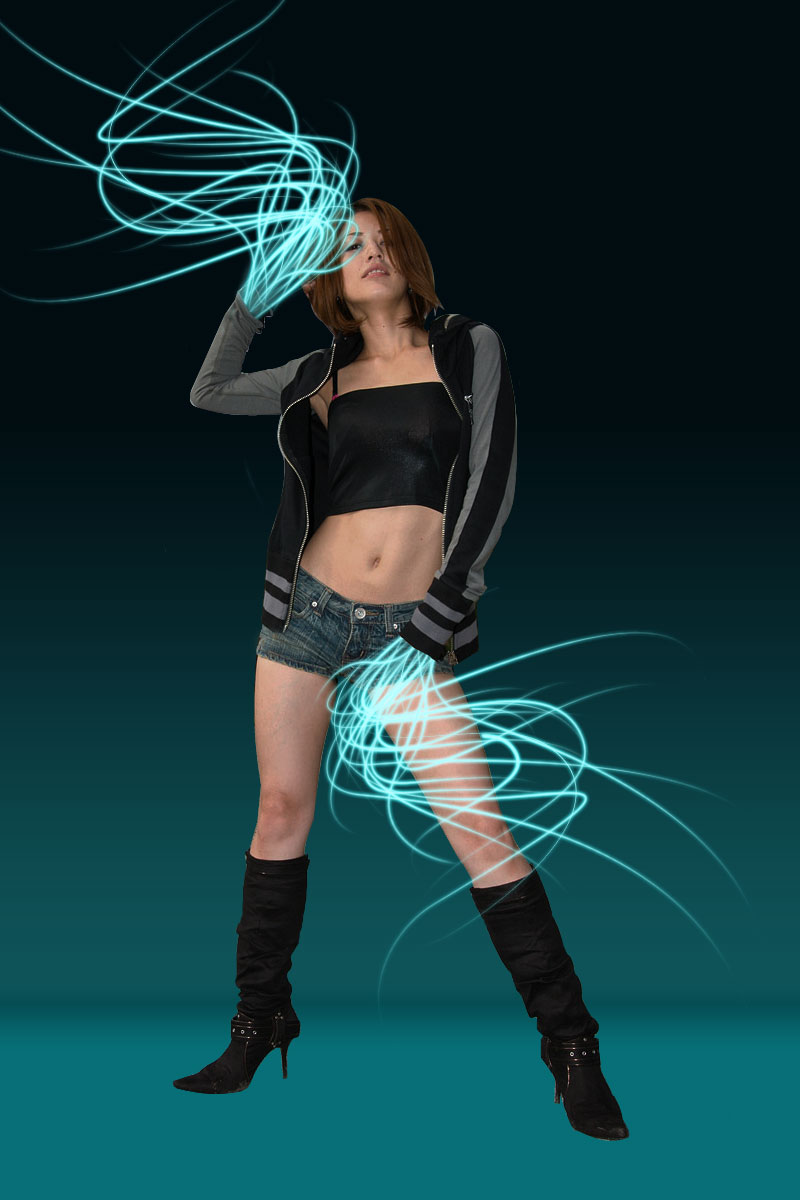
In our Photoshop Tutorial, we will create a Glowing Neon Girl from scratch. Throughout this tutorial, you will simply learn how to make some cool Glowing Effects in Photoshop. This is quite a little long so patience is a virtue.Take a look at the Preview of our Final Image.
Final Image Preview

Step 1
So to start, Open an new document in Photoshop.(800×1200). Working on our background,use #0e5358 and #020d11 color. Select Gradient Tool (G) and apply.

Step 2
Add New Layer. Select Rectangular Marquee Tool (M) and create a selection below the image. Use color #086f78. Then, Select Paint Bucket Tool (G) and apply a color.name the layer to BG1.

Step 3
Add another Layer. Name the layer to BG2 Shift+Click on BG1 layer so that selection will appear. Use color #000000 then select Gradient. Adjust the Gradient to foreground to Transparent. now apply the gradient on the upper part of the selection.

Step 4
Go to Filter>Blur>Gaussian Blur. From there,Set the Radius to 2 pixels. Do the same thing on BG1 layer. Now it will look something like this

Step 5
Now that we’re done on our background, lets add the model. You can download to Model Stock Photo in HERE Now Start Removing the back using Pen Tool (P) or Polygonal Lasso Tool (L). After removing the background of the Model Stock Photo, transfer it to our working document using Move Tool (V) by dragging. Name the layer to Model Stock Photo.
 .
.
Step 6
Lets try edit our Model Stock Photo first. Choose Lasso Tool (L) and select an area in the pants, Duplicate the selected are by Pressing CRTL+J then move it on the hand. The reason is we need to hide the hand using it. Once its on the right position you can use Clone Tool Tool (S) to clone the edges.

Step 7
Choose Lasso Tool (L) and select the area shown on the image below. After selecting, Press DELETE on your Keyboard.

Step 8
After all the editing and cutting our Image should now look something like this.

Step 9
Choose Polygonal Lasso Tool (L) and select an area on the Model Stock Photo jacket same as the image below. The reason of doing this has something to do with our next 2 Steps. Name this duplicate layer to Model Stock Photo 2

Step 10
Select Model Stock Photo layer then Click Add New Layer, This new layer is now between Model Stock Photo and Model Stock Photo 2 layer. Choose Pen Tool (P). adjust the Pen Tool to Path ![]() create something like on the image.
create something like on the image.

Step 11
Set color to #b0fcff. Right click to the path and choose Stroke Path>Brush. Make sure you check on Simulate Pressure.Name the layer to Glow. Now Right Click on the Glow layer and select Blending Mode then choose Outer Glow. from there, add color #2cecf1 ,Opacity to 100% and Size to 3 pixels.the effect will be like this.

Step 12
Continue adding more Glowing Effects and doing the same process until you made something like this one. Doing this 1 layer each in every path that you made is better so you have option to move and adjust.

Step 13
Add new Group and Put all the Glowing layer to the Group. Duplicate the Glow Group by Right click on the Group and choosing Duplicate Group.then move it to the other hand. Rotate the Group and Move it to the right position. CTRL+T then drag your mouse from the outside to Rotate the Group. Now you should have like this

Step 14
Now lets make the skin on the Model Stock Photo Glowing as well. Lets have a selection on the skin first. Select Magnetic Lasso Tool (L). Now start selecting the face. Then After the first selection Hold Shift then use the Magnetic Lasso Tool again so you can select another area while the first selection that you made is still selected. Do the same process until you finished selecting all the skin parts.

Step 15
Duplicate the Selected skin area and name it to Dup1. On the Duplicate layer, Adjust the hue/saturation. Go to Image>Adjustments>Hue/Saturation and set the Saturation to -100. Right Click the Dup1 layer and choose Blending mode. On the Blending Mode, Select Inner Shadow. Adjust the color to #94f3f6 and set Blend Mode to Color. The image will now look like this

Step 16
Duplicate the Dup1 and name it to Dup2. Right click the Dup2 and go to Blend Mode. This time add and additional adjustment in Inner Glow. Use color #0af2ea and Opacity to 100%. Now CTRL+I to invert the color.

Step 17
For the hair, Add New Layer and lets do the same process like what we did on the glow effect on the Model Stock Photo hands. Check out the image below.

Step 18
Use color #b0fcff. Right Click the path again and choose Stroke Path>Brush. make sure Simulate Pressure is Checked. Delete the path by pressing DELETE on your keyboard after the color is added. Right click the layer and choose Blending Mode. From there select Outer Glow and apply the color #2cecf1. and Opacity to 100%

Step 19
Continue doing the same process on the hair.You can use 1,2 or 3 pixels thick on the brushes to have different sizes.

Step 20
Go back to the Model Stock Photo layer and erase the head part of the image. after erasing it will now look like this.

Step 21
This time we will make the glowing shadow thing. Use color foreground to #23d5d9. Add new layer below the Model Stock Photo layer. Choose Brush Tool (B) Use a blurry brush with a Master Diameter of 40 pixels and apply the brush.check the image below. Name the layer to Light Shadow 1.

Step 22
Now Duplicate the Light Shadow 1 layer. Go to Filter>Blur>Gaussian Blur and set the Radius to 10 pixels.

Step 23
Now lets make the image a little dark so the glowing effect will be more emphasize. Add New Layer above glowing hair layers. Use color foreground to #31c1c7. Choose the brush and apply the brush on the whole body.

Step 24
Go to Filter>Blur>Gaussian Blur and set the Radius to 60 pixels.Name this layer to Add Glow.

Step 25
Now Our image is now something like this.

Step 26
On the layers palette change,set it to linear Burn and Opacity to 50%. Now our image will look like this.

Step 27
Time to add highlights on the jacket,short and the shoes. Add New layer above the Add Glow layer. Name it to Highlight. Choose Brush with a blurry brush and having a Master Diameter to 15 pixels. Apply the brush on the area which near to the skin Check the image below on where to add the highlights.

Step 28
On the layers palette, choose Color Dodge and Opacity to 60%. Now we have a little highlights.

Step 29
Now lets create a little Sparkling Effect on the hands Add new layer, and choose Brush Tool (B). Apply the brush on the Glowing Effect area. See the image below.

Step 30
On the Layer Palette, Set the layer to Dissolve and Opacity to 3%

Step 31
Let do another one. Add new Layer, use Brush Tool. Use Master Diameter of 5 pixels on the brush. Apply something similar on the image below.

Step 32
Add new layer. Now lets create a vertical line. Choose Brush Tool with a Master Diameter of 2 pixels and start making lines.

Step 33
On the Layer Palette, Set the layer to Dissolve and Opacity to 20%

Step 34
We’re almost done in here. for the last part, Add new layer and go to blending mode by right click on the layer and select Outer Glow. From there, Set the color to #2cecf1, Opacity to 100%, Noise to 38% and Size to 0%. Now choose Brush Tool with a Master diameter of 2 pixels and create a dot on the lower part on each and every vertical dissolving lines.
Sumber : http://naldzgraphics.net/


 la peau de l'avatar, pour laisser apparaitre la peau de celle de votre photo.


 avec une forme d'un contour adouci.


